Introduction
This website holds the documentation for TourForge, an open source set of software that makes it easy to create custom tour guide apps. TourForge has two main components: the TourForge tour builder (often just referred to as TourForge) and the software library TourForge Guide.
The TourForge tour builder, located at https://tourforge.github.io/builder/, is a web application that provides a simple interface to build the tour data files that are used by TourForge Guide. A work-in-progress tutorial on how to use TourForge is available in our guide on using the tour builder.
TourForge Guide is a Flutter library providing a baseline with the majority of features needed by a tour guide application. Although almost all of the work has already been done for you, building your app with the TourForge Guide library still requires some software engineering knowledge (or a lot of patience). You will need to set up your development environment and follow the guide on building an app.
Development Environment Setup (aarch64-darwin)
This guide outlines the core steps to initialize a development environment on Apple Silicon.
Required
- VS Code: Install via direct download. Instruction found online.
- Homebrew: Install via the official shell script. Instruction found online. This will also installs Xcode command-line tools as a side-effect.
- Nix Package Manager: Install the Nix package manager. Instruction found online.
- Xcode IDE: Installation options available either directly within Apple App Store. Alternatively, try the
xcodestool, which should be available for use in devenv setup. This may be necessary if you are on older Intel Mac who cannot get the latest Xcode.
Nix Configuration
Edit with sudo /etc/nix/nix.conf to enable experimental features and trust your local user. To find your current macOS username, run:
whoami
Add these lines to the configuration file (replacing $MAC_USERNAME with your actual username):
experimental-features = nix-command flakes
trusted-users = root $MAC_USERNAME
Nix setup will modify your /etc/zshrc. When OS X updates, it will sometimes restore the original /etc/zshrc which will break Nix. You can future proof things a little, and add the following to the top of your own ~/.zshrc:
# Nix
if [ -e '/nix/var/nix/profiles/default/etc/profile.d/nix-daemon.sh' ]; then
  . '/nix/var/nix/profiles/default/etc/profile.d/nix-daemon.sh'
fi
# End Nix
Add Packages
Install the primary CLI toolset via nix profile:
nix profile install nixpkgs#git nixpkgs#direnv nixpkgs#devenv nixpkgs#tree
NOTE: direnv no longer required since devenv 2.0.5
Project Workflow
To initialize a project environment (devenv supported environment only):
Clone the desired repository. Enter environment: Do the following while you are in the project root directory.
- Run
devenv shellmanually, or - Run
direnv allowto automatically load the.envrcconfiguration upon entering the directory. NOTE:direnvno longer required since devenv 2.0.5
NOTE: Building shell will need a stable internet connection and possibly takes a long time. Please plan accordingly. After the first-time building shell has finished, the download is cached and repeat runs is almost instantaneous.
Optional Enhancements
Nix Package Registry Customization
If you need to use unfree packages (i.e. proprietary software), run this command once to update your registry:
nix registry add nixpkgs github:numtide/nixpkgs-unfree/nixos-unstable
Applications & Shell
iTerm2: Install as a terminal emulator replacement. Generally nicer than MacOS system terminal. Instruction found online.
Zsh Plugins: Enhance your zsh shell with zsh-autosuggestions, zsh-completions, and zsh-syntax-highlighting. Installable via homebrew. Each package installed will also need manual intervention to add some certain snippet to .zshrc file.
Virtual (Emulator/Simulator)
iOS
TourForge currently does not support running iOS Simulator via command-line such as flutter run and similar things. We currently only support running the simulator graphically via Xcode.
On first launch, make sure you had run flutter pub get and pod install prior. Then on Xcode welcome screen, open existing project, with the workspace file found at ios/Runner.xcworkspace.
Check the following indicators to see if you could build and run simulator. First is that the target device should be a name of a real iPhone model. And that there is nothing weird or warning you on the Signing portion.
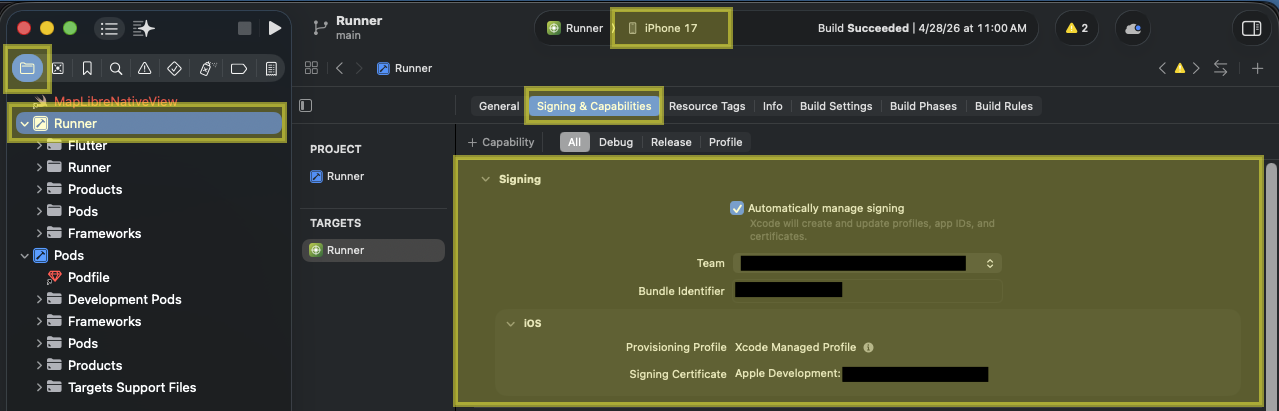
If in doubt, try and run it anyway and see what happens. To build and run, click on the play icon near the top left.
Android (Deprecated)
If this is the first time TourForge was setup on your device, then you can create an AVD with the following command:
avdmanager create avd --force --name my-android-emulator-name --package 'system-images;android-35;google_apis_playstore;arm64-v8a'
NOTE: Creating a custom hardware profile can be ignored. Also, the error of something like Warning: Observed package id 'ndk;29.0.14206865' in inconsistent location... can be safely ignored.
Then run said AVD with:
emulator -avd my-android-emulator-name
You can check what AVDs are available with emulator -list-avds.
At this point, an UI showing Android boot screen should show up. Wait for the device to fully booted up and then in a terminal, run flutter run and follow the interactive prompt to install the development build on the device.
Android with Run Configuration
This is paired with VSCode and extensions to bring tightly intergrated debug experience. Instead of manually creating AVD and manually compile and load the debug app into the device, we do 1-click run in VSCode and utilize the Flutter extension for full graphical debug.
This run config came built-in via the commited file for VSCode workspace settings .vscode/launch.json. This is more of a how to start debug guide rather than creating a virtual device guide, because while starting debug VSCode will have a selection menu that trivializes AVD creation.

Note that in that dropdown select menu, the iOS Simulator option will not work and neither does "Medium Phone API xx.x". After your very first debug session with an AVD created, the subsequent run you can select "flutter emulator".
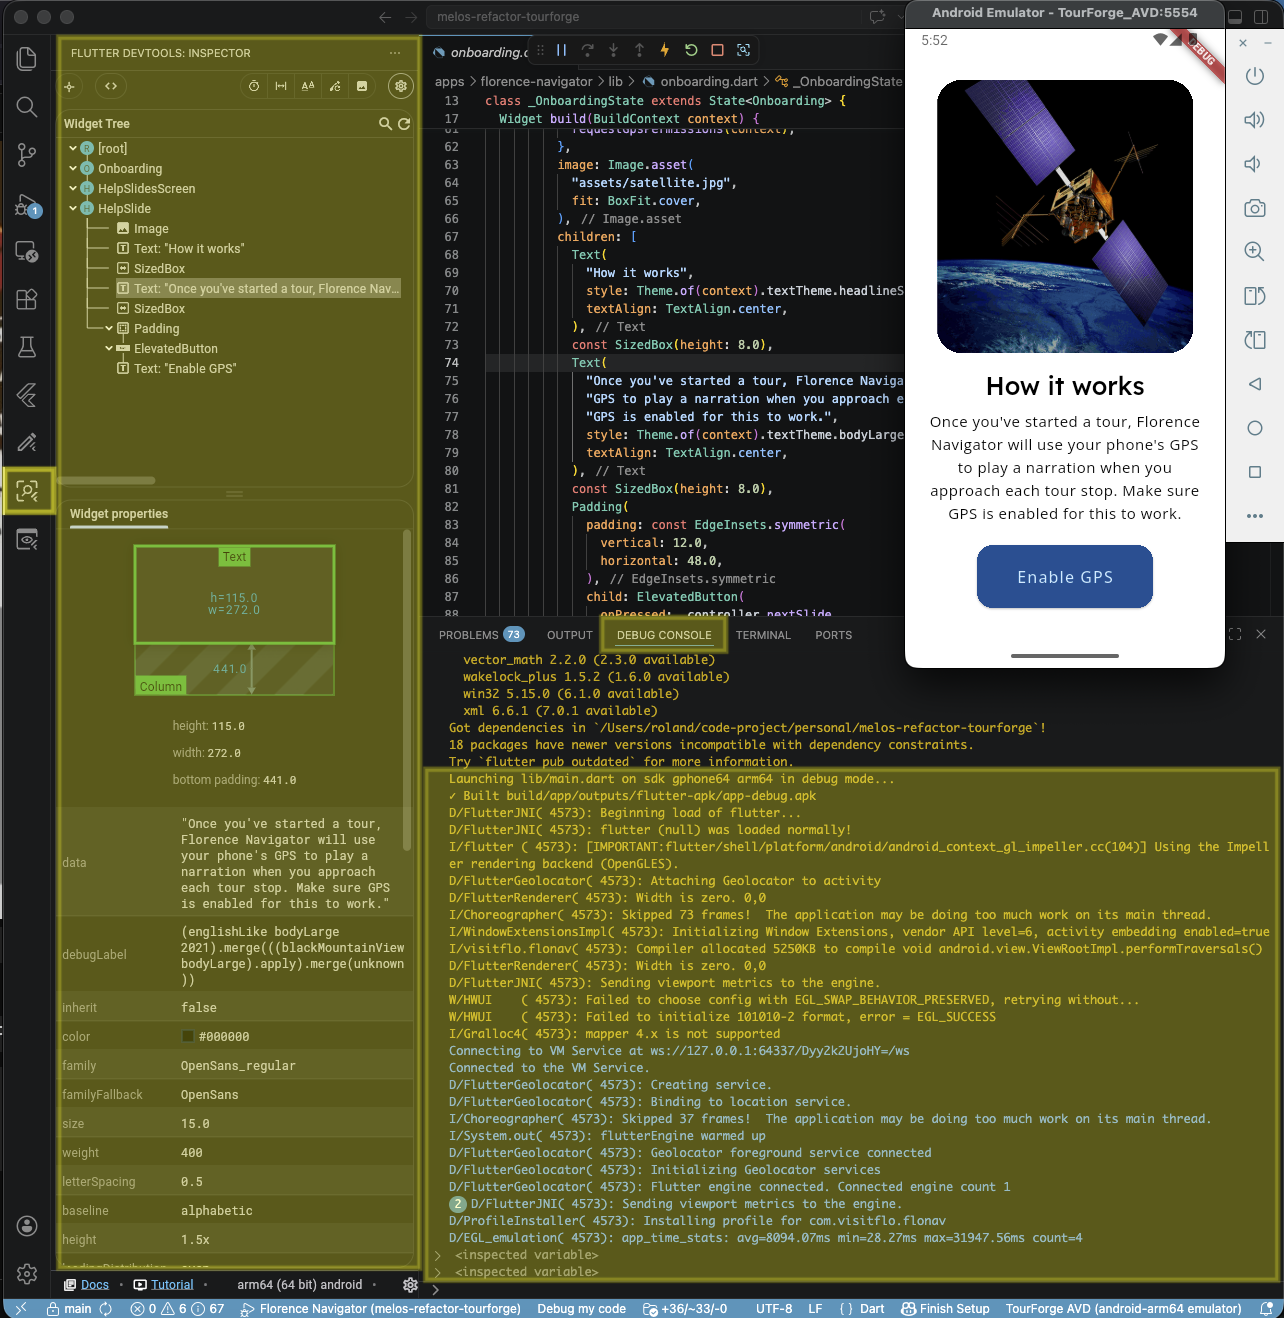
Check the Debug Console and the highlighted Flutter sidebar tab for full debug details.
Physical (Real Devices)
For this, all devices must be physically plugged into the development machine.
iPhone Setup
Complete the following steps:
- Device must be logged in with an Apple ID that is associated with the Apple Developer Team. Otherwise Apple won't sign the development build to run on the device.
- Enable developer mode
- Follow this documentation (https://developer.apple.com/documentation/xcode/enabling-developer-mode-on-a-device)
Android Setup
Complete the following steps:
- Enable developer options and then enable USB debugging
- Follow the top portion of this documentation (https://developer.android.com/studio/debug/dev-options)
Using the tour builder
This guide is currently a WIP as features of tour build webapp continues to change and evolve.
Setting up your development environment
Prerequisite
It is highly recommended to have the following devices to develop and deploy your own OpenTourBuilder instances on both iOS and Android:
- MacBook
- iPhone
- Android
You need the following registered accounts:
- Apple ID
- You should only use exactly one unique account for all Apple development devices due to special code signing requirement.
- Google Account
- GitHub
Additionally, completing and having these following items handy will speed up the setup process:
- GitHub fine-grained personal access token with
Public repositories (read-only)access.- Follow this section of the documentation (https://docs.github.com/en/authentication/keeping-your-account-and-data-secure/managing-your-personal-access-tokens#creating-a-fine-grained-personal-access-token)
- If you are a team member of OpenTourBuilder with write access, Your token must be setup this way instead:
All repositoriesaccess- Repository permissions with
Contentsset toRead and write - Resource owner is
opentourbuilder
MacBook Setup
Before you do anything else, login on the Mac through System Settings. This section assumes that you have an accessible administrator user account on the MacBook and is currently running at least MacOS 13 Ventura at the time of writing.
Software Installation
You can install these in-order:
-
Install Homebrew
- Follow this documentation (https://brew.sh/)
-
Install Ruby
- Follow this documentation (https://www.ruby-lang.org/en/documentation/installation/#homebrew)
-
Install CocoaPods
- Follow this documentation (https://guides.cocoapods.org/using/getting-started.html)
-
Install Xcode
- Follow this article (https://matteomanferdini.com/install-xcode/#xcode-app-store)
-
Install Flutter SDK
- Follow this documentation (https://docs.flutter.dev/get-started/install/macos)
-
Install Visual Studio Code
- Follow this documentation (https://code.visualstudio.com/docs/setup/mac)
-
Install Android Studio
- Follow this documentation (https://developer.android.com/studio/install#mac)
-
Install Android SDK Command-Line Tools
- Open this GUI at (https://developer.android.com/studio/intro/update#sdk-manager)
- Switch to
SDK Toolstab, you can find the required item in the list
Clone Git Repository
NOTE: Why did this instruction exists? Isn't SSH key enough?
Open the terminal at a desired location and run these commands, line-by-line:
git init
git remote add origin https://<YOUR_FINEGRAINED_TOKEN_HERE>@github.com/<ORGANIZATION_OR_USERNAME>/<REPOSITORY>.git
git checkout main && git fetch
The repository is ready to use. Repeat this entire process for any additional repository that you want to clone. Note that you must read README.md for the repository for any additional setups.
iPhone Setup
Complete the following steps:
- Login using a preferred Apple ID
- Enable developer mode
- Follow this documentation (https://developer.apple.com/documentation/xcode/enabling-developer-mode-on-a-device)
Android Setup
Complete the following steps:
- Login using a preferred Google account
- Enable developer options and then enable USB debugging
- Follow the top portion of this documentation (https://developer.android.com/studio/debug/dev-options)
Building an app
Since TourForge Baseline is a Flutter library, it can be used to create a tour guide application with customized branding without code changes to the library itself. Keep in mind that branding is only one piece of the puzzle: tours themselves must be created as well.
The steps below should help give you an idea of what is required to create a tour guide app with TourForge Baseline.
- Create a fork of the TourForge Baseline repository and clone it to your local machine.
- Get the app running by following the instructions in the TourForge Baseline repository's README.
- Upload your tour content, created using TourForge, to a webserver. The content with its full directory structure should be accessible via HTTPS. You will need to know the base URL of where the content is accessible, for example:
https://example.org/tour-content/. - Change the URL in the
app/lib/main.dartto whatever your content's base URL is. - Check and see if the app now loads your content instead of the default content. If not, here are some troubleshooting tips:
- Is it still showing the default content? If so, you might not have changed the right URL.
- Is the content not loading at all?
- Check the logs to investigate the exact error.
- Most likely, content not loading means that the URL is wrong or your webserver is not properly configured to serve the files.
- Try manually requesting the tour data from your webserver to see if it works that way.
- Customize the application's branding as you see fit.
Publish Existing App to Apple App Store
This can be done via Xcode. First, in the Menu Bar of Xcode, click Product > Archive. When asked about Xcode Cloud, ignore, we don't need to maintain more CI/CD for project this small.

When you click Archive it will build the app once. If succeed, Xcode will open a new dialog box, showing the Archive entry for the app that it just built. To submit this build to the app store developer team, click Distribute App as shown. The process can take a while.
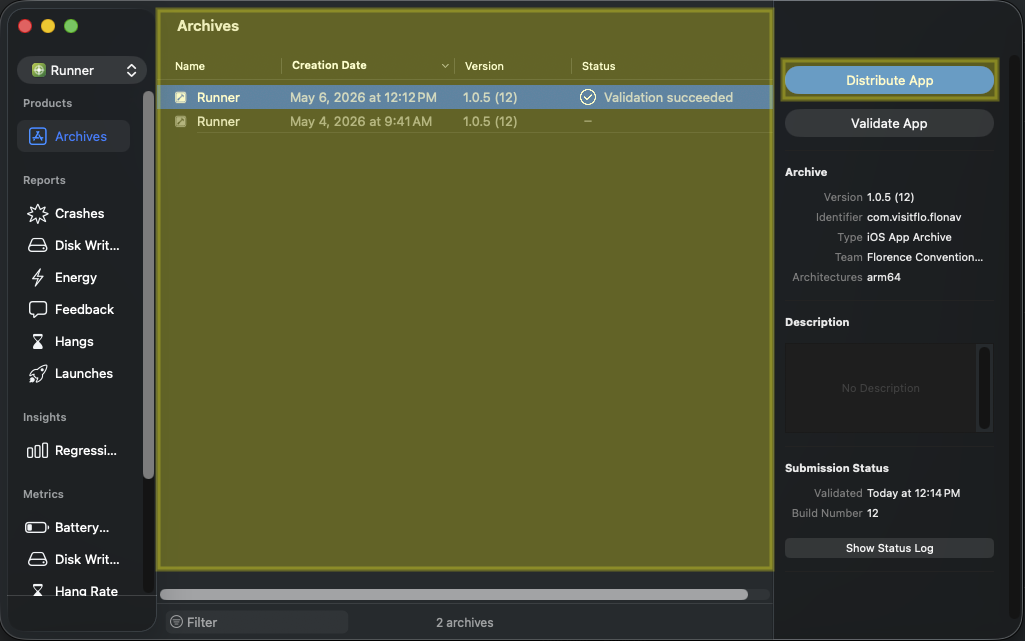
When finished uploading, go to (https://appstoreconnect.apple.com/apps) to choose the correct app that you just uploaded an archive to, and then go to the TestFlight tab:
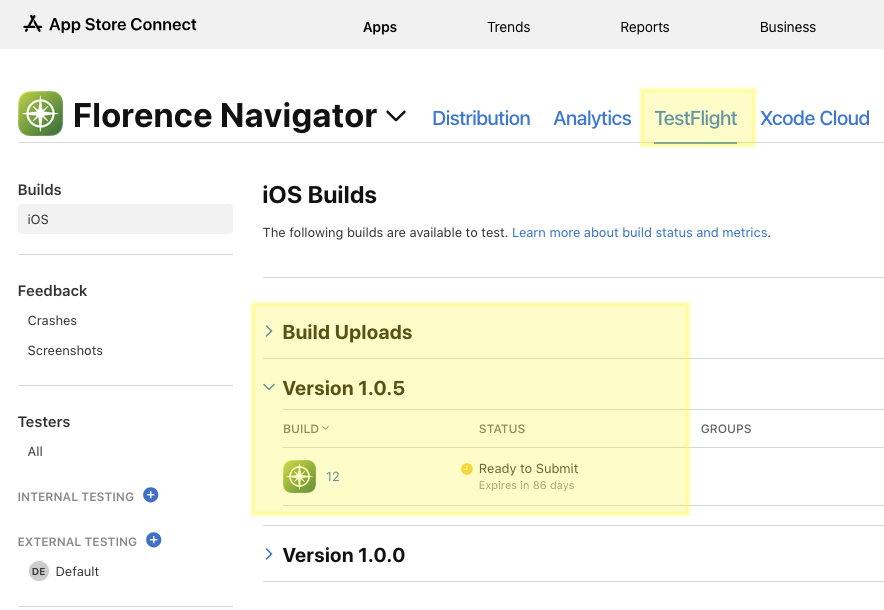
You will see the app version and the app build number like Xcode app info specification. Take note of the Status. In the screenshot, some time has passed and Apple had finished processing the uploaded archive. But right after Xcode finishes uploading and when you go to check the status it might say Pending or Processing for a while.
DISCLAIMER: Like Google app store, they want you to increment app version (e.g. 1.0.0, 1.0.5, etc...) which we can specify in whatever format we want (wthin reasons). But the build number is more restricted as it can only be whole number incrementing, this is usually taken as the tally for the number of times a new app build is submitted to an app store.
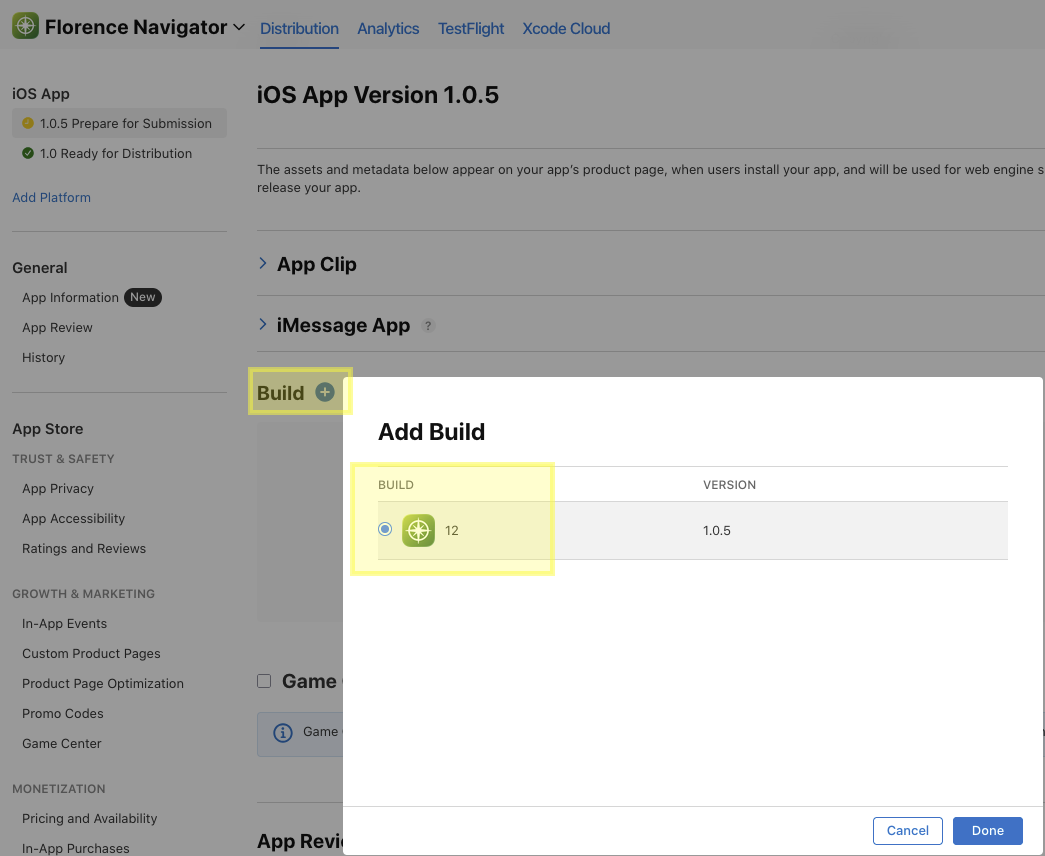
Once the archive says it is Ready to Submit, go to Distribution and click the blue plus button to add a new app update to an existing app:
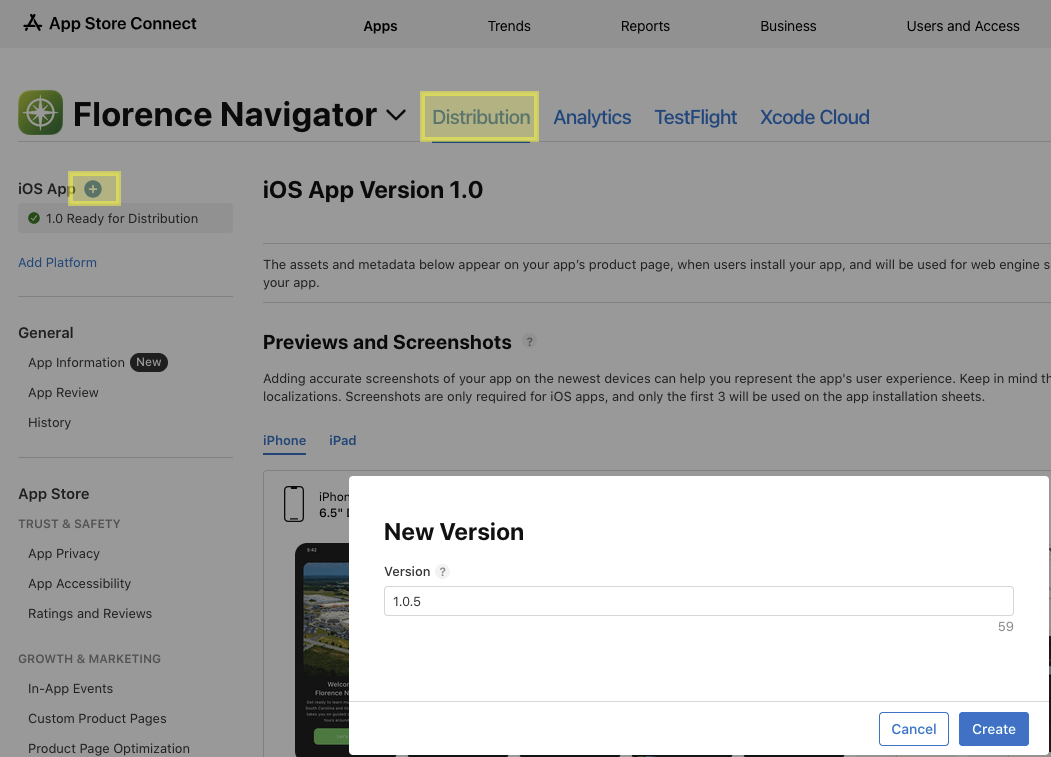
Scroll down until you see Build and tell Apple which uploaded build to use for the update:
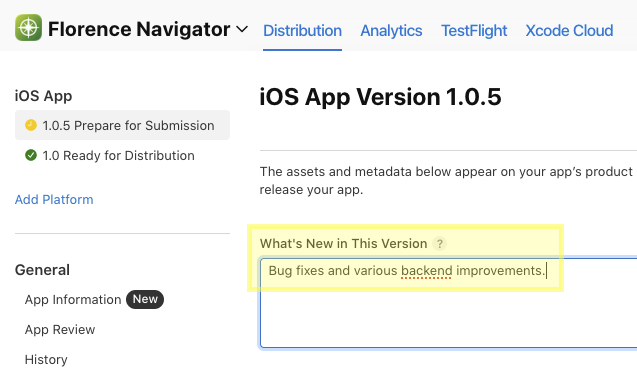
It is required that we provide a release note for what the app update was about, usually a generic statement like the following will suffice.
Click Save once, then the Add for Review blue button will unlock. There will be right-side panel pop up for confirming review submission:
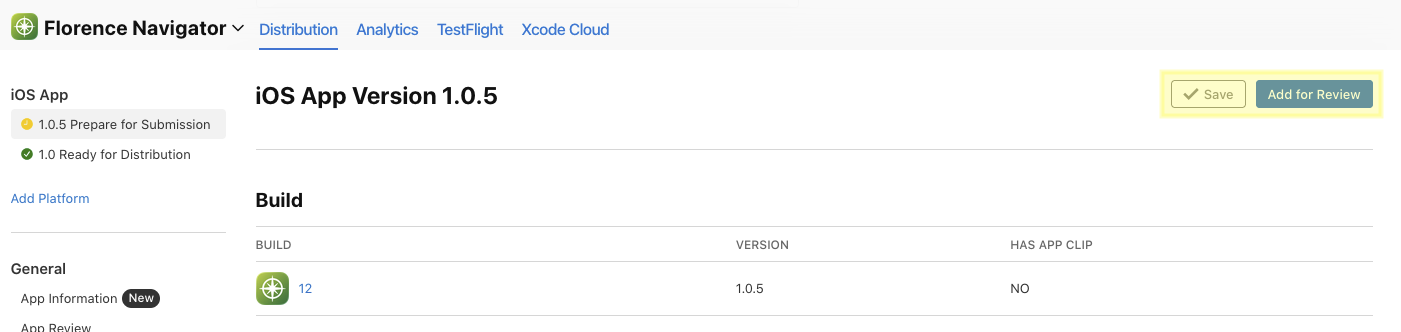
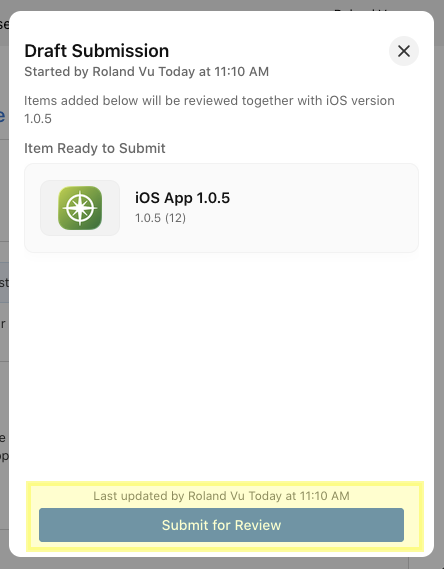
Once you clicked that, all is done maybe a prayer that Apple will pass our submission without delay!
Publishing an app
Prerequisite
You need the following registered accounts, the same one used in development machine setup:
- Apple ID
- Google Account
Depending on which platform you want to publish, you will need to have an active Google Play Developer and/or an active Apple Developer Program membership. You can also be a member of an organization with active memberships and publish under their behalf. If that is the case, make sure you have the necessary permission to create and publish a new application, usually Administrator role will be enough.
Apple App Store Publication
If you have not experienced publishing a mobile app before, this process can be daunting.
Register New Identifier
Follow this article (https://developer.apple.com/help/account/manage-identifiers/register-an-app-id/).
- Enable push notification capabilities
- Make sure to find and replace all instances of the old application ID with the newly created ID <-- NOTE: needs clarification on exactly what this means and why do we do it
Create New App Record
Follow this article (https://developer.apple.com/help/app-store-connect/create-an-app-record/add-a-new-app). The Apple developer portal has a lot of help panels/bubbles, it is highly recommended to read through them.
- The Bundle ID is the one used to create the identifier in the previous section
- Platform should only be
iOS
To archive and upload the app to Apple, follow the relevant section at (https://github.com/tourforge/baseline/blob/main/README.md).
Google Play Store Publication
If you have not experienced publishing a mobile app before, this process can be daunting. This article can help you understand the general process of publishing to Google Play Store (https://medium.com/@the_manifest/how-to-publish-an-app-on-google-play-a-step-by-step-guide-80f9f533e370). Note that you do not have to do anything regarding monetization since the app is free. Additionally, Google has an entire knowledge base to guide you through step-by-step (https://support.google.com/googleplay/android-developer/answer/9859152?hl=en). You can proceed to the next article in the series via the right-side navbar.
The high-level overview of the process is as follows:
- After you've created your Google Play developer account, you can create apps and set them up using Play Console.
- After you create your app, you can start setting it up.
- Your app’s dashboard will guide you through all the most important steps to get your app available on Google Play.
- You’ll start by providing details about your app’s content, and entering information for your Google Play store listing.
- After that, you can move onto app release; this guides you through pre-release management, and testing.
- The final step is launching your app on Google Play.
During the publication process, you should follow these recommended options:
- New app should be
Appas opposed toGame - App should be
Free - App category should be
Travel & Local
To build a signed release bundle, follow the relevant section at (https://github.com/tourforge/baseline/blob/main/README.md).
Issues & Workarounds
Apple App Listing Screenshots Requirements
Apple has an ever-changing screenshot requirements for all apps. Usually this is of little issue since we can simulate whatever devices to take screenshots. The problem is that the debug banner shows up because Xcode REQUIRES Debug mode in simulator, which causes the debug banner to show up in the screenshot.
Once you have researched what specific iOS device you need to simulate to make the screenshots. You must do 2 things:
- Switch
Mapbox.frameworkto the x86_64 simulator version if you haven't already done so (more details in the TourForge/baseline README). - Check out this thread (https://stackoverflow.com/questions/48893935/how-can-i-remove-the-debug-banner-in-flutter) and add the necessary bool value in the
MaterialAppconstructor.
Now you can run the app in the simulator without debug banner and happy screenshotting.